Adding White Ink to your Indesign file

Adding White Ink to your Indesign file

How to add white ink to your Indesign file

Creating the swatch

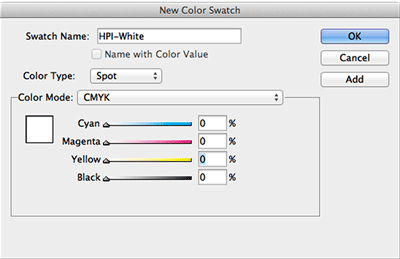
White ink requires a special swatch in your Indesign file. In Indesign, go to the swatches window and click the menu and select 'New Color Swatch'. The settings for the new swatch should be Color Type = Spot, Color Mode = CMYK, the values for each color should be 0%, and the Swatch Name should be HPI-White.


Assigning the white ink to an object

Select the object that you want to have printed using the white ink, and then select the stroke or fill of the object (the stroke is the outline, the fill is everything inside the object) and change it to be the HPI-White swatch that you created.

Positioning the objects

The objects that are supposed to be printed in white should be on top of everything else in the file. To help avoid confusion, you can create a new layer on top of everything and keep all the white objects on that layer in Indesign. 

Setting object attributes

HPI-White objects also need a special attribute set if they are to be printed correctly behind or above other colors. If you open the attribute window in Indesign and select the object that you assigned that HPI-White swatch to, you can select the checkbox for either 'overprint stroke' or 'overprint fill', whichever part of the object that the HPI-White was assigned to. 
p: 330.852.9922
p: 800.927.4196
f: 888.644.2280
e: cservice@cprinting.com

© 2024 Carlisle Printing